
Immunohistochemistry (IHC) Protocols: FFPE, Frozen, Whole-Mount, and Organoid Workflows
A practical protocol-selection guide for sample handling, antigen retrieval, antibody staining, detection, controls, and reproducible imaging.
- Fixation and sample geometry determine whether the epitope remains present and accessible.
- Antigen retrieval is usually a choice for fixed paraffin sections; it is not automatically transferred to frozen, whole-mount, or organoid workflows.
- Every reported comparison should retain the sample type, fixation, retrieval, antibody conditions, detection system, controls, and imaging settings.
Choose the protocol branch
Start with the material you need to preserve and the readout you need to obtain. FFPE is often chosen for durable morphology and section-based comparison. Frozen sections can be useful when fixation-sensitive epitopes or post-translational states are important. Whole-mount staining keeps an intact embryo or tissue segment for three-dimensional imaging, while organoid workflows must prevent loss of small, fragile structures during processing. Automated IHC adds a platform-specific execution layer; it does not remove the need for biological controls.
| Sample branch | Choose it when | Key preparation issue | Typical readout |
|---|---|---|---|
| FFPE / IHC-P | Long-term storage, tissue architecture, routine sectioning, or comparison across many blocks is important. | Fixation, paraffin processing, sectioning, deparaffinization, and epitope retrieval can all alter accessibility. | Bright-field chromogenic stain or fluorescence in a tissue section. |
| Frozen / IHC-Fr | A labile epitope, membrane protein, or fixation-sensitive state may be lost during chemical processing. | Freezing artefacts, cryostat handling, and the choice of post-section fixation must be controlled. | Fluorescent or chromogenic signal in a cryosection. |
| Whole mount | The intact three-dimensional arrangement of an embryo, organ segment, or tissue piece is the primary question. | Antibody penetration, permeabilization, clearing, long incubations, and depth-dependent signal. | Two- or three-dimensional fluorescence or colorimetric imaging. |
| Organoid | A three-dimensional in-vitro model must be assessed for structure, composition, or spatial marker patterns. | Small size and fragility can cause loss during washing, transfer, embedding, or sectioning. | Whole-mount imaging or serial frozen/paraffin sections. |
| Automated IHC | Throughput and process consistency on a validated instrument are priorities. | Reagent packs, retrieval, timing, and detection chemistry are platform-specific. | Usually standardized chromogenic slides, with platform-defined imaging and scoring. |
Do not select a branch only because an antibody datasheet lists “IHC.” Confirm the tested sample preparation, species, fixation, retrieval, and detection format. The same antibody can work in one branch and fail in another.
Universal workflow and checkpoints
The sequence below is shared by most IHC workflows, but the branch determines which steps are required and how they are optimized.
| Stage | Action | Checkpoint before continuing |
|---|---|---|
| 1. Define the experiment | Write the target, sample type, expected localization, detection format, and intended comparison. | The positive and negative control plan matches the claim. |
| 2. Handle and preserve | Minimize delay, drying, compression, and unrecorded changes before fixation or freezing. | Record collection time, fixation or freezing start, sample dimensions, and storage condition. |
| 3. Prepare the sample | Embed and section, or cryosection, or keep the specimen intact for whole mount. | Sections are intact, attached, and representative; whole mounts remain structurally intact. |
| 4. Improve access | Use deparaffinization and antigen retrieval for many FFPE targets; use fixation and permeabilization choices for frozen or whole-mount samples. | The treatment is compatible with the epitope and does not destroy morphology. |
| 5. Block background | Block nonspecific binding and, when relevant, endogenous peroxidase, biotin, or autofluorescence. | The blocking reagent is compatible with the antibody host and detection chemistry. |
| 6. Bind antibodies | Apply direct or indirect antibody conditions, with dilution and incubation taken from a validated starting point. | The antibody solution covers the sample and the species pairing is compatible. |
| 7. Detect and mount | Develop a chromogen or acquire fluorescence, then counterstain and mount when appropriate. | Signal is within the imaging range and the section has not dried or been damaged. |
| 8. Interpret with controls | Compare experimental signal with controls, morphology, localization, proportion, and intensity. | Any conclusion is limited to the tested sample, assay, and validation evidence. |
For a general IHC workflow, antigen retrieval, direct and indirect detection, and control strategy, see Magaki et al. and Kim et al.[1][2]
FFPE (IHC-P) starting workflow
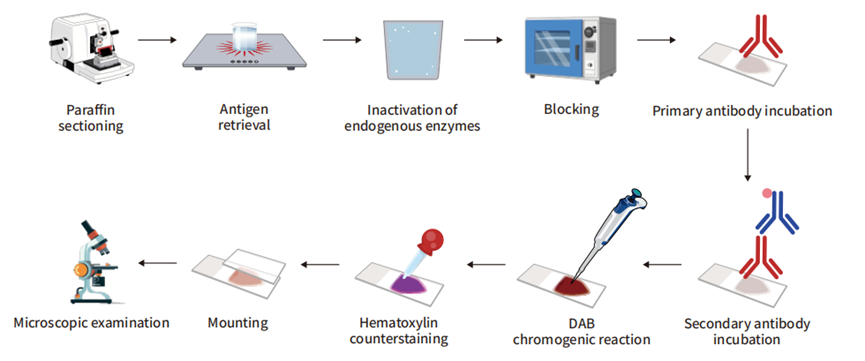
FFPE preserves tissue architecture and supports durable blocks, but formalin cross-linking and paraffin processing can mask epitopes. The source protocol lays out a complete path from fixation through sectioning, deparaffinization, retrieval, blocking, antibody incubation, and detection. Use the following as a planning template and record every deviation.
Materials and equipment
- Tissue, a documented fixative, phosphate-buffered saline (PBS), and appropriately sized containers.
- Ethanol, a clearing agent such as xylene or a validated alternative, paraffin, molds, and cassettes.
- Microtome, blade, water bath, microscope slides, drying equipment, and a slide rack.
- Antigen-retrieval buffer and a validated heating apparatus, or an enzyme-retrieval solution and temperature-controlled incubator.
- Wash buffer, protein-blocking reagent, optional endogenous peroxidase or biotin block, antibody diluent, primary antibody, and compatible secondary antibody or directly labeled primary antibody.
- Chromogenic substrate or fluorophore-compatible mounting medium, optional counterstain, coverslip, and microscope.
Step 1: Fix promptly and consistently
Cut tissue to a geometry that the fixative can penetrate, avoid compression and drying, and document the interval from collection to fixation. The cited FFPE guide gives 10% neutral-buffered formalin or 4% paraformaldehyde as common examples and lists 18–24 hours at 4°C for small tissue blocks; these are source-specific starting conditions, not a universal requirement. Under-fixation can produce uneven or edge-predominant staining, whereas over-fixation can mask epitopes. Fixation time, tissue size, target, and downstream processing must be optimized together.
Step 2: Embed, section, and dry
Rinse away residual fixative, dehydrate through ethanol, clear the tissue, and infiltrate with paraffin according to the wax and processor instructions. The source guide uses sections in the 3–10 µm range and a warm water bath for flattening; preserve the section thickness, bath temperature, drying condition, and slide type in the method record. Discard visibly damaged sections rather than interpreting folds, holes, or detached regions as biology.
Step 3: Deparaffinize and rehydrate without drying
Remove wax with a compatible clearing agent, then rehydrate through graded alcohol into water. As one starting schedule, the cited guide uses two 10–15 min clearing steps followed by repeated alcohol steps of about 5 min each.[S1] Incomplete wax removal can block antibody access; allowing a slide to dry after rehydration can increase background. Replace hazardous solvents only with a validated alternative and its matching exchange instructions.
Step 4: Select and optimize antigen retrieval
Many formalin-fixed targets require retrieval before antibody incubation. Heat-induced epitope retrieval (HIER) uses a compatible buffer and controlled heat; the source guide gives example settings of 110°C for 15–30 min in a pressure-based chamber or 98°C for 20 min in a scientific microwave, followed by cooling. Enzymatic retrieval uses a protease selected for the antigen; the same guide suggests an initial 5–10 min test at the enzyme’s working temperature and recommends comparing a wider 5–30 min range during optimization. These settings are not interchangeable across instruments or antibodies. Retrieval can increase signal, damage morphology, or destroy an epitope when overdone.
Step 5: Block the relevant background
Protein blocking reduces nonspecific antibody binding. A common starting range in the cited protocol is 2–10% normal serum from the species used to raise the secondary antibody, or a serum-free protein block.[S1] Do not use serum from the primary-antibody host when it would create additional background. Add endogenous peroxidase or biotin blocking only when the detection chemistry requires it.
Step 6: Incubate the primary and secondary antibodies
For indirect detection, incubate the primary antibody, wash, incubate the species-compatible labeled secondary antibody, and wash again. The source workflow uses overnight primary incubation at 4°C as an example and approximately 10–30 min for the secondary antibody at room temperature; the antibody datasheet and pilot titration determine the actual conditions.[S1] For direct detection, the labeled primary antibody replaces the primary–secondary pair. Keep the section completely covered and protect fluorophore-labeled reagents from light.
Step 7: Detect, counterstain, mount, and image
For chromogenic detection, apply a substrate compatible with the enzyme label and stop development when the signal is within the planned contrast range. For fluorescence, use a compatible mounting medium and acquire channels with settings that remain comparable across samples. Counterstain only when it helps the intended readout. Record the microscope, objective, exposure or detector settings, file format, and any image-processing rule before scoring.
Frozen-section (IHC-Fr) workflow
Frozen sections can shorten processing and help preserve some fixation-sensitive epitopes, but they are more vulnerable to freezing artefacts and section damage. A cited frozen-tissue protocol embeds fresh tissue in OCT, snap-freezes it, cuts cryosections in the 5–8 µm range, and selects the post-section fixative according to the target and antibody.
- Freeze promptly. Orient the tissue in OCT and use a validated rapid-freezing method. Prevent warming and repeated freeze–thaw cycles.
- Cut and mount. Trim the block, discard damaged leading sections, cut the planned thickness, and use slides that retain the section during washes.
- Fix after sectioning when required. The source guide lists 4% paraformaldehyde, acetone, or methanol as examples. The choice affects morphology, permeability, and epitope preservation; test it with the target rather than treating the list as interchangeable.
- Block and wash. Use a protein block compatible with the secondary antibody and detection system. Peroxidase or biotin blocking is conditional, as in FFPE.
- Stain and detect. The source protocol gives direct-antibody examples of 1 h at room temperature or overnight at 4°C, and indirect-primary examples of 1–2 h at room temperature or overnight at 4°C. These are starting conditions that require optimization.
- Mount and image. Use a mounting medium matched to chromogenic or fluorescent detection. Inspect for folds, cracks, ice-crystal holes, and uneven thickness before interpreting signal.
Routine HIER is often unnecessary for frozen sections, but soluble targets or a particular fixation may still require an access step. A negative frozen result should therefore be interpreted with a frozen-tissue positive control and the same post-section fixation.
Whole-mount IHC
Whole-mount staining keeps an intact embryo, organ segment, or tissue piece so that spatial relationships can be imaged in three dimensions. It trades section-level access for a penetration problem: antibodies, washes, and light must reach the relevant depth. The source whole-mount guide emphasizes fixation, permeabilization, antibody incubation, washing, and imaging without sectioning.
- Define the imaging depth and target compartment. A surface epitope, nuclear marker, and deep vascular or stromal target may require different fixation and permeabilization choices.
- Fix without over-hardening. Fixation must preserve structure while leaving a path for antibody penetration. The appropriate fixative and duration are model-specific.
- Permeabilize and block. Use a detergent or other validated access step only to the extent needed; aggressive treatment can extract membranes or soluble proteins.
- Allow sufficient antibody access. Whole-mount primary and secondary incubations are often much longer than section protocols. Rock gently, keep the sample covered, and use a volume that supports exchange without losing the specimen.
- Clear or mount for the microscope. Clearing chemistry can improve depth imaging but may be incompatible with some fluorophores, antibodies, or mounting materials.
- Image with depth-aware controls. Record objective, z-step, depth, channel settings, and the region that was actually sampled. A bright surface signal does not prove that the target is absent from deeper tissue.
A published mouse-embryo workflow combines whole-mount fixation, multimarker staining, transparency treatment, confocal imaging, and analysis; its two-color example takes about six days in that model.[5] That duration and chemistry should not be transferred to another embryo, tissue density, antibody, or clearing system without a pilot.
Organoids and IHC
Organoids add two constraints: they are small enough to be lost during processing, and their three-dimensional organization can be damaged by handling or clearing. Decide whether the question requires whole-mount architecture or section-level cellular detail.
| Organoid goal | Preferred branch | Critical control |
|---|---|---|
| Preserve overall 3D organization | Whole-mount staining with validated permeabilization, washing, and imaging depth. | Depth-matched positive control and a plan for background and clearing compatibility. |
| Score cell types or subcellular localization | Paraffin or frozen sections, often across serial levels. | Prevent organoid loss and retain orientation during inclusion and sectioning. |
| Compare structure across many organoids | Supported embedding and a standardized sectioning and scoring workflow. | Define how many organoids, sections, and fields contribute to each comparison. |
A 2026 Bio-protocol describes direct fixation of human organoids within their culture matrix and HistoGel inclusion to reduce loss during paraffin processing; it also discusses the trade-off between whole-mount imaging and sectioning.[6] Treat that approach as a model-specific method and adapt the support material, fixation, and section thickness to the organoid type and matrix.
For organoids, record the culture matrix, organoid size range, fixation start and end, support material, orientation, section thickness, and the number of organoids represented. A single well or a single visually intact organoid is not a sufficient replicate for a population-level conclusion.
Automated IHC and platform transfer
Automated stainers can coordinate deparaffinization, retrieval, blocking, antibody incubation, washing, chromogen development, and coverslipping. They improve execution consistency within a validated platform, but they do not make an antibody specific or make a manual protocol portable. Revalidate when the instrument, reagent pack, antibody lot, retrieval program, or detection chemistry changes.
- Map each manual stage to the instrument’s actual reagent and temperature program.
- Run the same positive, negative, and internal controls used for manual staining.
- Keep the platform-specific protocol separate from the biological interpretation; a validated clinical or research platform claim is not evidence for every tissue or antibody.
- For automated multiplexing, validate order effects, stripping or blocking between antibody sets, spectral or chromogenic separation, and image-analysis rules.
Controls and validation
Controls should enter the workflow at the stage where an error could occur. The Histochemical Society standards emphasize that omitting the primary antibody alone does not prove primary-antibody specificity; it mainly tests background from the secondary antibody and detection system.[3]
| Control | Place it in the workflow | What it supports | What it cannot prove alone |
|---|---|---|---|
| Positive tissue or model | Process with the same fixation, retrieval, antibodies, detection, and imaging as the test sample. | The assay can reveal the expected target pattern under those conditions. | That an experimental negative is biologically absent if the control failed. |
| Biological negative or target-reduced model | Use a tissue, cell line, knockout, knockdown, or other model with an independent reason to expect low or absent target. | Evidence about specificity in the tested context. | Absolute specificity if processing or target biology differs. |
| No-primary control | Omit the primary while retaining the rest of the protocol. | Background from secondary antibody, substrate, tissue, and imaging. | Specific recognition by the primary antibody. |
| Isotype or matched immunoglobulin | Use only when its design matches species, isotype, concentration, and conjugation. | Some concentration- or class-related nonspecific effects. | A stand-alone specificity test. |
| Internal tissue control | Identify a structure in the same section or whole mount with an expected pattern. | Local processing and anatomical reference. | Target specificity across other compartments. |
| Retrieval or fixation comparator | Run matched sections with alternative retrieval or fixation only during optimization. | Whether access conditions, rather than antibody identity, limit the signal. | A universal “best” condition for other samples. |
For a new antibody, validate the antibody and the sample preparation together. Antibody dilution alone cannot rescue an epitope lost during fixation, and a strong signal in one tissue does not transfer automatically to another species, compartment, or processing branch.
Troubleshooting by observable symptom
| Observed result | Possible causes | First checks | How to verify a change |
|---|---|---|---|
| Weak or absent signal everywhere | Target is low, epitope is masked, retrieval is incompatible, antibody is inactive, or detection chemistry failed. | Positive control, fixation history, retrieval buffer and temperature, antibody identity and storage, detection reagent. | Repeat a matched positive control and confirm the expected localization, not only a darker image. |
| Strong edge signal with a weak center | Uneven or incomplete fixation, thick tissue, delayed penetration, or section artefact. | Block dimensions, time to fixation, fixative volume, tissue orientation, and section integrity. | Compare a better-controlled block or a thinner representative section. |
| High diffuse background | Excess antibody, insufficient blocking or washing, endogenous enzyme, autofluorescence, or dried sections. | No-primary control, block compatibility, antibody dilution, wash performance, peroxidase/biotin block, and imaging exposure. | Background should decrease while the positive-control pattern remains interpretable. |
| Section detaches or tears | Slide adhesion, section thickness, retrieval stress, incomplete drying, or harsh handling. | Slide type, drying history, water-bath temperature, rack material, retrieval intensity, and tissue folds. | Use a matched section and confirm that morphology survives the full workflow. |
| Uneven whole-mount or organoid depth | Limited antibody penetration, inadequate permeabilization, clearing mismatch, or depth-dependent illumination. | Sample size, incubation time, rocking, detergent, clearing chemistry, and z-stack settings. | Use a depth-matched control or section the same specimen to compare internal signal. |
| Fluorescence fades or channels bleed | Photobleaching, unsuitable mounting, high exposure, spectral overlap, or autofluorescence. | Dark handling, filter set, exposure, channel order, mounting medium, and single-label controls. | Re-image a control with fixed settings and confirm channel separation. |
| Chromogen is too dark or nonspecific | Overdevelopment, active endogenous enzyme, excessive antibody, or substrate instability. | Development time, peroxidase block, substrate preparation, negative control, and antibody titration. | Use a timed pilot and stop when the positive-control contrast is adequate. |
Check controls and sample processing before changing several variables at once. A protocol adjustment is informative only when the control set and imaging conditions remain comparable.
Frequently asked questions
Can I use an FFPE antigen-retrieval protocol on frozen sections?
Usually not without a validation experiment. Frozen sections have different fixation, permeability, and morphology, and many do not require routine retrieval. Start with the frozen-tissue protocol and a frozen positive control.
Is a published incubation time a fixed requirement?
No. Published times are method-specific starting points. Antibody affinity, tissue thickness, fixation, temperature, agitation, and detection chemistry can shift the optimum. Change one variable at a time and keep controls in the run.
Should every IHC workflow use heat retrieval?
No. HIER is common for many formalin-fixed paraffin targets, while enzymatic retrieval, no retrieval, or a frozen-section access strategy may be more appropriate for another antigen. Excessive retrieval can damage morphology or antigenicity.
Is whole-mount IHC automatically better for organoids?
No. Whole mount preserves 3D structure but makes penetration, clearing, background, and depth imaging harder. Sectioning is often better when the question is subcellular localization or cell-type scoring.
Can automated staining replace assay validation?
No. Automation standardizes instrument execution. It does not establish antibody specificity, sample compatibility, expected localization, or the validity of a biological conclusion.
References
- Magaki S, Hojat SA, Wei B, So A, Yong WH. An Introduction to the Performance of Immunohistochemistry. Methods in Molecular Biology. 2019;1897:289–298. doi:10.1007/978-1-4939-8935-5_25. PMCID: PMC6749998. ↩
- Kim SW, Roh J, Park CS. Immunohistochemistry for Pathologists: Protocols, Pitfalls, and Tips. Journal of Pathology and Translational Medicine. 2016;50(6):411–418. doi:10.4132/jptm.2016.08.08. PMCID: PMC5122731. ↩
- Hewitt SM, Baskin DG, Frevert CW, Stahl WL, Rosa-Molinar E. Controls for immunohistochemistry: the Histochemical Society’s standards of practice for validation of immunohistochemical assays. Journal of Histochemistry & Cytochemistry. 2014;62(10):693–697. doi:10.1369/0022155414545224. PMCID: PMC4212362. ↩
- Park G, Kim SS, Shim J, Lee S-JV. Brief guide to immunostaining. Molecules and Cells. 2025;48(1):100157. doi:10.1016/j.mocell.2024.100157. PMCID: PMC11699723. ↩
- Yokomizo T, Yamada-Inagawa T, Yzaguirre AD, Chen MJ, Speck NA, Dzierzak E. Whole-mount three-dimensional imaging of internally localized immunostained cells within mouse embryos. Nature Protocols. 2012;7(3):421–431. doi:10.1038/nprot.2011.441. PMCID: PMC3629302. ↩
- Brossard L, Perreaux V, Vales S, et al. Histological Processing of Organoids for Immunostaining. Bio-protocol. 2026;16(14):e5750. doi:10.21769/BioProtoc.5750. PMID: 42516584. PMCID: PMC13403117. ↩