
Sandwich ELISA
1. What Is Sandwich ELISA?
Enzyme-linked immunosorbent assay (ELISA) is an immunological detection technique based on specific antigen–antibody binding. It is widely used for protein quantification, cytokine detection, biomarker analysis, and disease research.
Based on assay design, ELISA is commonly classified into direct, indirect, sandwich, and competitive formats. Sandwich ELISA offers high specificity and sensitivity and is widely used for protein quantification, particularly in complex biological samples such as serum, plasma, cell culture supernatants, and tissue lysates.
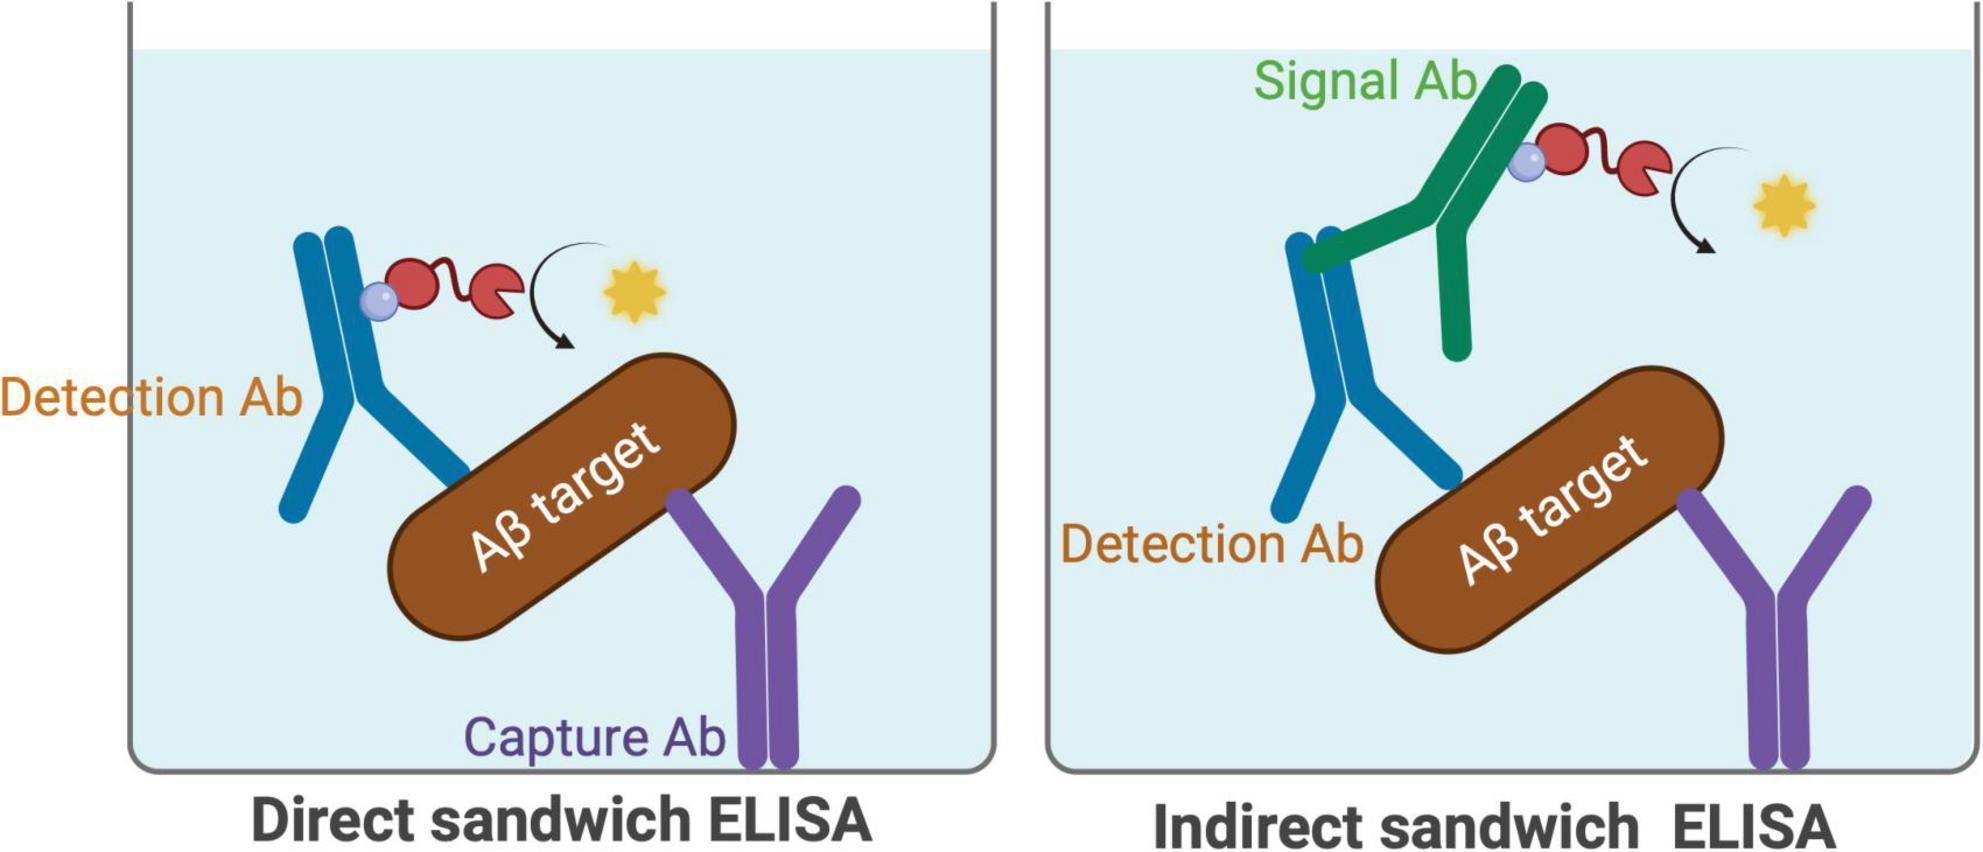
Figure: Schematic illustration of direct and indirect sandwich ELISA. © Metzendorf et al., 2025. CC BY 4.0.Reference:
Reference: Key considerations for ELISA-based quantification of diverse amyloid beta forms in murine brain homogenates
2. Principles of Sandwich ELISA
Sandwich ELISA uses two antibodies that recognize different epitopes on the same antigen to form a capture antibody–antigen–detection antibody complex.
First, a capture antibody is immobilized on the surface of a microplate well. After the sample is added, the target antigen binds specifically to the capture antibody. A detection antibody is then introduced to recognize another epitope on the antigen, forming a stable sandwich complex.
The detection antibody may be directly conjugated to a reporter enzyme such as horseradish peroxidase (HRP), or signal detection may be achieved using an enzyme-conjugated secondary antibody. Alternatively, biotin conjugation can be combined with a biotin–avidin system (BAS) to further enhance detection sensitivity. Upon addition of a suitable substrate, the enzyme catalyzes a reaction that produces a measurable colorimetric, fluorescent, or chemiluminescent signal.
Within the effective quantification range of the assay, signal intensity generally increases with the concentration of the target antigen. The concentration of the target protein can therefore be calculated from a standard curve.
Compared with direct and indirect ELISA, the sandwich format recognizes the target antigen using two antibodies. This approach can substantially reduce background noise and nonspecific interference, improving measurement accuracy in complex samples and making it particularly useful for low-abundance targets. However, the antigen must contain two epitopes that can be bound simultaneously, so the method is not suitable for all small-molecule antigens.
3. Antibody Selection and Experimental Preparation
Antibody quality and compatibility between the antibody pair directly influence the performance of sandwich ELISA.
3.1 Capture and Detection Antibodies
The capture antibody immobilizes the target antigen, while the detection antibody recognizes the captured antigen. Both antibodies must bind simultaneously without substantial epitope overlap or steric interference.
Monoclonal antibodies generally offer high epitope specificity; polyclonal antibodies can recognize multiple epitopes but may increase the risk of cross-reactivity; recombinant antibodies can improve lot-to-lot consistency. Using validated matched antibody pairs helps reduce the effort required for antibody screening and assay optimization.
3.2 Materials and Equipment
Sandwich ELISA typically requires a microplate, capture antibody, detection antibody, standards, blocking buffer, wash buffer, an enzyme-conjugated secondary antibody (if applicable), detection substrate, and stop solution. Common equipment includes pipettes, a centrifuge, and a microplate reader.
For assays developed in-house, select a microplate appropriate for the detection method. Transparent plates are commonly used for colorimetric detection, black plates for fluorescence assays, and white plates for chemiluminescence assays.
4. Sandwich ELISA Experimental Procedure
A typical sandwich ELISA workflow consists of six stages: sample preparation, capture antibody coating, blocking and sample addition, detection antibody incubation, enzymatic signal development, and data analysis.
4.1 Sample Preparation (Brief Examples)
Different biological sample types require appropriate pretreatment to maintain antigen stability and minimize interference.
Cell Lysates: Collect cells and add a suitable lysis buffer, together with protease inhibitors as needed (for example, phosphatase inhibitors should also be added when measuring phosphorylated proteins). Lyse samples at 4°C for approximately 15–30 minutes, then centrifuge to remove insoluble material and retain the supernatant for analysis.
Cell Culture Supernatants: Collect culture medium and centrifuge at 4°C to remove cells and debris. Use the clarified supernatant.
Tissue Samples: Process tissues promptly under cold conditions, add lysis buffer, and homogenize. After protein extraction, centrifuge to remove tissue debris and collect the supernatant.
Serum and Plasma: Collect serum samples in tubes without additives and allow them to stand at room temperature for approximately 20 minutes before centrifugation and supernatant collection. For plasma, use an anticoagulant compatible with the assay and separate the plasma by centrifugation.
Aliquot prepared samples for storage. If immediate analysis is not possible, samples may be stored at −80°C depending on the stability of the target protein. Avoid repeated freeze–thaw cycles whenever possible.
4.2 Capture Antibody Coating and Blocking
The purpose of capture antibody coating is to immobilize target-specific antibodies on the microplate surface, creating binding sites for subsequent antigen capture.
In conventional sandwich ELISA, the capture antibody is first immobilized on the microplate surface. A blocking buffer is then applied to occupy uncoated binding sites and reduce nonspecific adsorption.
For ready-to-use ELISA kits supplied with pre-coated microplates, these steps are generally completed by the manufacturer. Users can proceed with the subsequent steps according to the kit instructions.
4.3 Antigen Incubation
The incubation times, sample volumes, and washing steps below are general reference conditions. For commercial ELISA kits, always prioritize the instructions supplied with the specific product.
Add appropriately diluted standards, samples, or quality controls at approximately 100 μL per well. Incubate with gentle shaking at room temperature for 1–2 hours to allow the antigen to bind to the capture antibody. Wash the plate three times to remove unbound sample components.
4.4 Detection Antibody Incubation
Binding of the detection antibody to the captured antigen is essential for formation of the sandwich complex. Two common detection formats are distinguished by whether the detection antibody itself is directly enzyme-labeled.
Direct Enzyme-Labeled Detection: Dilute the enzyme-conjugated detection antibody in blocking buffer or a suitable antibody diluent. Add approximately 100 μL per well and incubate for 1–2 hours at room temperature or overnight at 4°C. Wash three times before adding the detection substrate.
Indirect Enzyme-Labeled Detection: Add approximately 100 μL per well of unlabeled detection antibody. Incubate for 2 hours at room temperature or overnight at 4°C. After washing three times, add approximately 100 μL per well of an appropriate enzyme-conjugated secondary antibody, incubate for another 1–2 hours at room temperature, and wash three more times to remove unbound secondary antibody.
When using indirect enzyme-labeled detection, pay particular attention to the specificity of the secondary antibody to avoid recognition of the capture antibody, which could increase nonspecific background.
4.5 Substrate Development and Signal Measurement
After antibody incubation, signals can be generated by enzyme-catalyzed substrate reactions. HRP is a commonly used reporter enzyme in ELISA, and frequently used chromogenic substrates include TMB, OPD, and ABTS.
TMB is one of the common chromogenic substrates for HRP. Upon addition of TMB, the HRP-catalyzed reaction produces a blue product. Following termination with a suitable acidic stop solution, the solution generally turns yellow, and absorbance can be measured at 450 nm.
Reaction times, stopping procedures, and detection wavelengths differ among substrate systems; follow the specific reagent instructions. To minimize well-to-well variation, maintain consistent temperature across wells and standardize the timing of reagent addition, color development, and reaction termination.
| Chromogenic Substrate | Color Development | Reference Reaction Time | Detection Wavelength |
|---|---|---|---|
| TMB | Blue after oxidation; yellow after acid stopping | 15–30 min | 450 nm (after stopping) |
| OPD | Produces an orange-yellow product upon oxidation | 10–30 min | 450 nm (after stopping); 490 nm (before stopping) |
| ABTS | Produces a green reaction product | Approx. 20 min | 405 nm |
4.6 Data Analysis and Quantification
After measuring the signal, use a standard curve to convert absorbance into target antigen concentration. Subtract the appropriate blank background, then plot standard concentration on the x-axis against the corresponding detection signal on the y-axis.
For many quantitative ELISA assays, a four-parameter logistic (4PL) model is commonly used for curve fitting. Determine sample concentrations from the fitted curve and multiply by the appropriate sample dilution factors to obtain the final values.
The following quality-control indicators may also be assessed to evaluate assay reliability:
| Quality-Control Metric | Reference Criterion |
|---|---|
| Standard-curve fit | R² > 0.99 |
| Spike recovery | 80%–120% |
| Intra-assay coefficient of variation (CV) | <10% |
| Inter-assay coefficient of variation (CV) | <15% |
5. Common Problems and Troubleshooting
Sandwich ELISA performance can be affected by antibody properties, sample quality, reagent conditions, and experimental technique. When weak signal, high background, poor reproducibility, or an unsatisfactory standard curve occurs, the following troubleshooting suggestions may help.
5.1 Weak or No Signal
| Possible Cause | Recommended Solution |
|---|---|
| Target antigen is below the detection limit | Reduce sample dilution where appropriate; concentrate the sample if necessary. |
| Antibody concentration is too low or incubation is too short | Optimize antibody concentration and incubation conditions within the permitted range to allow sufficient antigen–antibody binding. |
| Antibodies or detection reagents have lost activity | Check storage conditions and expiration dates, avoid repeated freeze–thaw cycles, and verify the assay with a positive control. |
| Sample type or buffer is incompatible | Confirm the sample types supported by the kit; avoid reagents containing sodium azide or other substances that may inhibit HRP activity. |
| Incorrect reading wavelength or development conditions | Check the plate-reader wavelength and follow the reagent instructions for development time and temperature. |
5.2 High Background
| Possible Cause | Recommended Solution |
|---|---|
| Insufficient plate washing | Complete the prescribed washing steps and, if appropriate, optimize the washing procedure to remove residual unbound antibodies. |
| Excessive detection antibody concentration | Optimize antibody dilution to reduce nonspecific binding. |
| Insufficient blocking or nonspecific binding | Optimize blocking reagent and conditions for in-house assays; follow kit instructions for pre-coated plates. |
| Contaminated wash buffer | Prepare fresh wash buffer and prevent microbial or particulate contamination. |
| Excessively long substrate reaction | Control substrate incubation time and read the plate promptly after stopping, as directed. |
5.3 Poor Reproducibility or High CV
| Possible Cause | Recommended Solution |
|---|---|
| Pipetting errors or inadequate reagent mixing | Use calibrated pipettes, follow consistent pipetting practices, and mix reagents thoroughly. |
| Inconsistent washing among wells | Apply the same washing procedure to every well and check that all channels of an automated plate washer function properly. |
| Bubbles in microplate wells | Check for and remove bubbles before measurement to avoid absorbance interference. |
| Temperature differences or edge effects | Equilibrate reagents and the plate to an appropriate temperature and use a plate seal during incubation to limit evaporation. |
| Inconsistent sample handling or storage | Standardize sample processing and storage; minimize repeated freeze–thaw cycles. |
5.4 Poor Standard Curve
| Possible Cause | Recommended Solution |
|---|---|
| Incorrect standard dilution | Check standard concentrations and serial dilution steps to ensure accurate dilution ratios. |
| Incomplete reconstitution of standards | Reconstitute standards thoroughly according to instructions and check for undissolved material. |
| Degraded or improperly stored standards | Store and handle standards as instructed and avoid using expired reagents. |
| Pipetting errors | Use calibrated pipettes to accurately dispense each standard concentration. |
| Unsuitable curve-fitting model | Select an appropriate fit, such as 4PL or 5PL, based on the data and inspect back-calculated standard concentrations. |
5.5 Sample Matrix Effects
| Possible Cause | Recommended Solution |
|---|---|
| Interference from endogenous components in serum, plasma, or other samples | Dilute samples appropriately to reduce the effects of complex matrices on antigen–antibody binding and signal generation. |
| Sample diluent is incompatible with the assay | Use the sample diluent recommended by the kit and evaluate matrix effects using spike-recovery and dilution-linearity experiments. |
Note: These are general troubleshooting recommendations. Antibody combinations, incubation conditions, and reagent formulations vary between ELISA systems; always follow the relevant kit instructions. For ready-to-use kits with pre-coated plates, users should not independently alter coating or blocking conditions.
6. Applications and Limitations of Sandwich ELISA
Sandwich ELISA is widely used to quantify cytokines, growth factors, hormones, and a variety of protein biomarkers. It is valuable in basic research, drug development, and the development of clinical testing methods.
Its main advantage is the ability of two-antibody recognition to improve specificity, including for low-abundance proteins in complex biological samples. Limitations include dependence on high-quality matched antibodies, multiple incubation and washing steps, and possible matrix effects in samples such as serum and plasma.
Careful antibody selection, standardized sample processing, and a robust quality-control strategy are therefore essential for reliable results.
7. Conclusion
Sandwich ELISA is a mature and widely used protein quantification method. Through dual recognition by capture and detection antibodies, it enables sensitive and specific detection of target antigens in complex biological samples.
Key considerations include antibody pairing, sample preparation, blocking and washing, incubation conditions, and standard-curve quality. Appropriate quality control and assay optimization can further improve accuracy and reproducibility, providing reliable data for life science research.